


Photo Enhancer vs Upscaler: Which One Does Your Photo Actually Need?
They sound like the same thing and they solve different problems. How to tell which one your photo needs, why the order matters, and what happens when you get it backwards.
 EnhanceIT
PRO
EnhanceIT
PRO
📚 Complete Guide: The Complete Guide to AI Photo Enhancement in 2026
How Can I Enhance My Image Quality Using Adobe Lightroom? It’s a question that seems on everyone’s lips—like a common thread weaving through photography. By using Adobe Lightroom, you can breathe new life into your images with just a few simple steps.
In this article, we’ll walk you through the most effective ways to sharpen your images, along with alternative methods. By the end, you’ll be able to enhance your photos as easily as pie.
Try it yourself!
Use our free AI Image Enhancer tool – no signup required.
[
Try AI Image Enhancer Free →
](https://enhanceit.pro/)
The word “Enhance” is like adding the cherry on top of your image—sharpening the details, enriching the colours, and improving the texture. Adobe Lightroom allows you to do just that. You can increase your image size and resolution by converting it to a DNG file, but remember, the file must be in RAW format to get the best results.
Example: Imagine you took a picture of a sunset, but the colours look dull. By using the Enhance tool, you can make the oranges and pinks look as bright as they did in real life!
Images that need a little more TLC (tender loving care) are a breeze to enhance. Back in the day, cameras couldn’t capture images in full frames—they were limited to 8×10 or 11×14 prints, making cropping a risky business as it could lead to pixelation.
Also Read: Enhancing Low-Resolution Images to High-Resolution Using GIMP
Today, however, cameras have come a long way, capturing images in stunning 35-40MP. This makes it easier to crop without worrying about quality loss. Even micro cameras can snap photos in the 21MP range. When you do a tight crop, it might lose some of its shine, but Lightroom’s Enhance feature can bring back its sparkle.
Example: You took a picture of your dog, but you want to zoom in on its face. When you do, the picture might get blurry. Lightroom can help you make your dog’s face look sharp and clear again!
There are three different ways to find the Enhance feature in Lightroom:
Follow this step-by-step guide to bring your images up to scratch using Lightroom:
Example: Let’s say you took a picture at night, and it’s a bit noisy (grainy). You can use the Noise Reduction tool to make it smooth and clear.
When you hit the “Enhance” button, a pop-up window will appear, showing you what’s in store for your image. The preview window gives you a closer look at the enhanced areas. To see the original version without enhancement, simply click on the Preview window, and it’ll give you a glimpse of the past.
When you click on the blue Enhance box, Lightroom gets to work on your newly improved DNG image file. Don’t worry—your RAW image will remain untouched, like a backup plan in case things don’t go as expected.
Here are some pearls of wisdom to keep in mind while enhancing your images:
If your image still isn’t picture-perfect, try these methods:
Fix lens-related issues like distortion and vignetting by enabling Profile Correction in the Lens settings.
Eliminate those pesky colour fringes at the edges of your images with the Chromatic Aberration removal tool.
Whether you want to focus on a specific object, prepare an image for a particular format, or simply enhance its quality, Lightroom’s cropping tool has you covered. It’s as easy as pie!
Have a landscape photo that’s a bit off-kilter? Straighten it using the crop tool. Just drag a line from one end of the image to the other, and Lightroom will do the rest.
Remove distortion in images, particularly those with buildings, using the Upright Tool in the Lens Correction settings.
Example: If you took a picture of a tall building and it looks like it’s leaning, the Upright Tool can make it stand tall and straight.
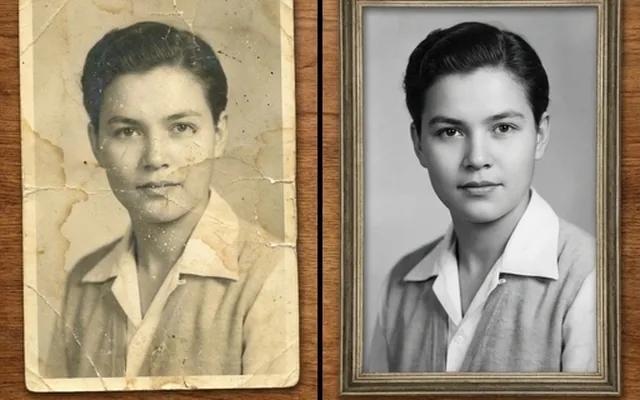
If Lightroom doesn’t quite hit the mark for you, consider giving EnhanceIT PRO a whirl. It’s like having a magic wand for your photos, offering features like AI photo enhancement, old image restoration, and even anime image enhancement.
With an easy-to-use interface and everything handled by AI, EnhanceIT PRO is a top-notch alternative. At least give it a try—you might find it’s just what the doctor ordered.
How do you enhance photos in Lightroom?
Open your image in Lightroom, choose Photo > Enhance, select Super Resolution, and click Enhance.
How do you enhance blurry photos in Lightroom?
Adjust the Sharpness of your images, and they’ll start becoming as clear as day.
How do I edit perfectly in Lightroom?
Practice makes perfect. Keep at it, and before long, you’ll be editing like a pro.
How do I increase clarity in Lightroom?
By increasing your image’s sharpness, you can boost its clarity and make it crisp as a morning breeze.
What is the alternative to Lightroom?
EnhanceIT PRO is the best alternative, offering features that can enhance your photos with the click of a button. All enhancements are done by AI. It smoothly adjusts your image colour and makes it sharper and enhanced.
📖 More in Photo Enhancement & Quality
They sound like the same thing and they solve different problems. How to tell which one your photo needs, why the order matters, and what happens when you get it backwards.
Remini popularised AI photo restoration and then put most of it behind a subscription. Seven alternatives compared on what they actually do well, what they charge, and where each one falls down.
Resizing and upscaling are not the same thing. What actually happens when you enlarge a photo, how far you can push it honestly, and where AI reconstruction stops being recovery and starts being invention.
What 'HD' actually means in pixels, how far a low-resolution photo can honestly be pushed, and the free route from a small blurry picture to something you can print or publish.